
Do you know that you could use your Raspberry Pi 🍇 to make a Bitcoin lottery miner ?
How ?
Back in old days, we was able to buy USB Asic Miners from the internet, like the NanoFury, the GekkoScience etc..
Right now, you could use them to mine, but for example even with 2.2Gh/s of power, you’ll win less than 3 satoshis ₿ per day only
But we can do something fun and maybe who could make us some big satoshis ₿ amount
The goal here, is simply to use solo mining, in case we have sent the last shares needed to find the block, we can get rewarded the entire amount from the block ( 6 BTC right now ) + the transactions fees, which could make around 7 BTC in total
Requirements :
- a Raspberry Pi + 16Go SDCard (Class10) with Raspberry Pi 🍇 OS installed
- a Raspbian Jessie image
- an USB Hub with external power ( Size depends on your USB Asics Miners )
- an USB Fan
- 15 min of your time
Step 1: Physical Setup 🍇
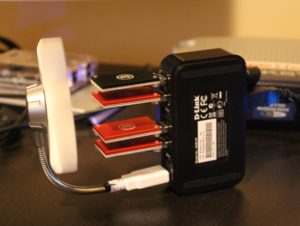
I’ve made some tests with Raspberry Pi 2 and 3b+
In my opinion, you should be able to run it smoothly on a Raspberry Pi3 b+, it also gots the Wifi that can avoid the Ethernet cable and let you place it anywhere you want into your house,
On my side, I’ve made a Raspberry Pi3 b+ with a small screen attached directly to it, so I’ll be manage some fun stuff like videos or pictures running, note that also some people use Raspberry Pi Zero W with a small screen to show the stats and the blocks found, as most of those projects are old, I’ll have to check a little deeper and will come with updates soon
Step 2: Terminal Setup 💻
Now let’s go and install the Cgminer to be able to run our bitcoin lottery,
First of all, connect to your Raspberry Pi, you can either connect :
– With SSH
– With HDMI Screen
– With VNC Viewer
Tips : Default Username/Password are : pi / raspberry
First we upgrade everything, we install the packages and then we install CGMiner :
sudo apt-get get update
sudo apt-get get upgrade
apt-get install libusb-1.0-0-dev libusb-1.0-0 libcurl4-openssl-dev libncurses5-dev libudev-dev autoconf libtool

sudo apt-get install cgminer
Congrats 🎉
You have now installed CGMiner on your Raspberry Pi 🍇
Step 3: Solo Mining ⛏
Now that we have our Raspberry Pi 🍇 ready to mine, we have to select a solo mining pool 🏖
You can find some mining pools such as :
– https://btc.solomining.io/
– http://solo.ckpool.org/
The only thing you need at this point is a Bitcoin 🍕 address to be able to receive your rewards,
On each pools, you have to check :
– The best server for your location ( ex for 🇪🇺 : stratum+tcp://europe.solomining.io:7777 )
– Your Bitcoin Wallet Address ( It’s your username on the pool )
– The password ( depends on the pool, can be ‘X‘ )
After checking all those parameters,
You will simply need to launch CGMiner with your own configuration
cgminer -o stratum+tcp://ServerAddress:Port -u WalletAddress -p Password
Congrats 🎉
You are now Mining Solo ⛏ with your Raspberry Pi 🍇
You just need to keep it somewhere and let it run until maybe one day you could get a block reward (More than 6 ₿ right now)💰 and could go to the 🚀 🌑
Good Luck Satoshi 🧙♂️